Archive for the ‘wordpress’ Category

git by example - upgrade wordpress like a ninja

September 21st, 2008

I addressed the issue of wordpress upgrades once before. That was a hacky home grown solution. For a while now I've been using git instead, which is the organized way of doing it. This method is not specific to wordpress, it works with any piece of code where you want to keep current with updates, and yet you have some local modifications of your own.

To recap the problem shortly.. you installed wordpress on your server. Then you made some changes to the code, maybe you changed the fonts in the theme, for instance. (In practice, you will have a lot more modifications if you've installed any plugins or uploaded files.) And now the wordpress people are saying there is an upgrade available, so you want to upgrade, but you want to keep your changes.

If you are handling this manually, you now have to track down all the changes you made, do the upgrade, and then go over the list and see if they all still apply, and if so re-apply them. git just says: you're using a computer, you git, I'll do it for you. In fact, with git you can keep track of what changes you have made and have access to them at any time. And that's exactly what you want.

1. Starting up (the first time)

The first thing you should find out is which version of wordpress you're running. In this demo I'm running 2.6. So what I'm going to do is create a git repository and start with the wordpress-2.6 codebase.

# download and extract the currently installed version
wget http://wordpress.org/wordpress-2.6.tar.gz
tar xzvf wordpress-2.6.tar.gz
cd wordpress

# initiate git repository
git-init

# add all the wordpress files
git-add .

# check status of repository
git-status

# commit these files
git-commit -m'check in initial 2.6.0 upstream'

# see a graphical picture of your repository
gitk --all

This is the typical way of initializing a repository, you run an init command to get an empty repo (you'll notice a .git/ directory was created). Then you add some files and check the status. git will tell you that you've added lots of files, which is correct. So you make a commit. Now you have one commit in the repo. You'll want to use the gui program gitk to visualize the repo, I think you'll find it's extremely useful. This is what your repo looks like now:

gitk is saying that you have one commit, it's showing the commit message, and it's telling you that you're on the master branch. This may seem odd seeing as how we didn't create any branches, but master is the standard branch that every repository gets on init.

The plan is to keep the upstream wordpress code separate from your local changes, so you'll only be using master to add new wordpress releases. For your own stuff, let's create a new branch called mine (the names of branches don't mean anything to git, you can call them anything you want).

# create a branch where I'll keep my own changes
git-branch mine

# switch to mine branch
git-checkout mine

# see how the repository has changed
gitk --all

When we now look at gitk the repository hasn't changed dramatically (after all we haven't made any new commits). But we now see that the single commit belongs to both branches master and mine. What's more, mine is displayed in boldface, which means this is the branch we are on right now.

What this means is that we have two brances, but they currently have the exact same history.

2. Making changes (on every edit)

So now we have the repository all set up and we're ready to make some edits to the code. Make sure you do this on the mine branch.

If you're already running wordpress-2.6 with local modifications, now is the time to import your modified codebase. Just copy your wordpress/ directory to the same location. This will obviously overwrite all the original files with yours, and it will add all the files that you have added (plugins, uploads etc). Don't worry though, this is perfectly safe. git will figure out what's what.

Importing your codebase into git only needs to be done the first time, after that you'll just be making edits to the code.

# switch to mine branch
git-checkout mine

# copy my own tree into the git repository mine branch
#cp -ar mine/wordpress .. 

# make changes to the code
#vim wp-content/themes/default/style.css

# check status of repository
git-status

When you check the status you'll see that git has figured out which files have changed between the original wordpress version and your local one. git also shows the files that are in your version, but not in the original wordpress distribution as "untracked files", ie. files that are lying around that you haven't yet asked git to keep track of.

So let's add these files and from now on every time something happens to them, git will tell you. And then commit these changes. You actually want to write a commit message that describes exactly the changes you made. That way, later on you can look at the repo history and see these messages and they will tell you something useful.

# add all new files and changed files
git-add .

# check in my changes on mine branch
git-commit -m'check in my mods'

# see how the repository has changed
gitk --all

When you look at the repo history with gitk, you'll see a change. There is a new commit on the mine branch. Furthermore, mine and master no longer coincide. mine originates from (is based on) master, because the two dots are connected with a line.

What's interesting here is that this commit history is exactly what we wanted. If we go back to master, we have the upstream version of wordpress untouched. Then we move to mine, and we get our local changes applied to upstream. Every time we make a change and commit, we'll add another commit to mine, stacking all of these changes on top of master.

You can also use git-log master..mine to see the commit history, and git-diff master..mine to see the actual file edits between those two branches.

3. Upgrading wordpress (on every upgrade)

Now suppose you want to upgrade to wordpress-2.6.2. You have two branches, mine for local changes, and master for upstream releases. So let's change to master and extract the files from upstream. Again you're overwriting the tree, but by now you know that git will sort it out. ;)

# switch to the master branch
git-checkout master

# download and extract new wordpress version
cd ..
wget http://wordpress.org/wordpress-2.6.2.tar.gz
tar xzvf wordpress-2.6.2.tar.gz
cd wordpress

# check status
git-status

Checking the status at this point is fairly important, because git has now figured out exactly what has changed in wordpress between 2.6 and 2.6.2, and here you get to see it. You should probably look through this list quite carefully and think about how it affects your local modifications. If a file is marked as changed and you want to see the actual changes you can use git-diff <filename>.

Now you add the changes and make a new commit on the master branch.

# add all new files and changed files
git-add .

# commit new version
git-commit -m'check in 2.6.2 upstream'

# see how the repository has changed
gitk --all

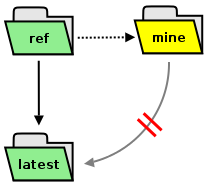
When you now look at the repo history there's been an interesting development. As expected, the master branch has moved on one commit, but since this is a different commit than the one mine has, the branches have diverged. They have a common history, to be sure, but they are no longer on the same path.

Here you've hit the classical problem of a user who wants to modify code for his own needs. The code is moving in two different directions, one is upstream, the other is your own.

Now cheer up, git knows how to deal with this situation. It's called "rebasing". First we switch back to the mine branch. And now we use git-rebase, which takes all the commits in mine and stacks them on top of master again (ie. we base our commits on master).

# check out mine branch
git-checkout mine

# stack my changes on top of master branch
git-rebase master

# see how the repository has changed
gitk --all

Keep in mind that rebasing can fail. Suppose you made a change on line 4, and the wordpress upgrade also made a change on line 4. How is git supposed to know which of these to use? In such a case you'll get a "conflict". This means you have to edit the file yourself (git will show you where in the file the conflict is) and decide which change to apply. Once you've done that, git-add the file and then git-rebase --continue to keep going with the rebase.

Although conflicts happen, they are rare. All of your changes that don't affect the changes in the upgrade will be applied automatically to wordpress-2.6.2, as if you were doing it yourself. You'll only hit a conflict in a case where if you were doing this manually it would not be obvious how to apply your modification.

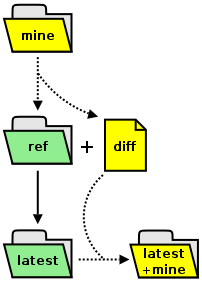
Once you're done rebasing, your history will look like this. As you can see, all is well again, we've returned to the state that we had at the end of section 2. Once again, your changes are based on upstream. This is what a successful upgrade looks like, and you didn't have to do it manually. :cap:

Tips

Don't be afraid to screw up

You will, lots of times. The way that git works, every working directory is a full copy of the repository. So if you're worried that you might screw up something, just make a copy of it before you start (you can do this at any stage in the process), and then you can revert to that if something goes wrong. git itself has a lot of ways to undo mistakes, and once you learn more about it you'll start using those methods instead.

Upgrade offline

If you are using git to upgrade wordpress on your web server, make a copy of the repo before you start, then do the upgrade on that copy. When you're done, replace the live directory with the upgraded one. You don't want your users to access the directory while you're doing the upgrade, both because it will look broken to them, and because errors can occur if you try to write to the database in this inconsistent state.

Keep your commits small and topical

You will probably be spending most of your time in stage 2 - making edits. It's good practice to make a new commit for every topical change you make. So if your goal is to "make all links blue" then you should make all the changes related to that goal, and then commit. By working this way, you can review your repo history and be able to see what you tried to accomplish and what you changed on each little goal.

Revision control is about working habits

You've only seen a small, albeit useful, slice of git in this tutorial. git is a big and complicated program, but as with many other things, it already pays off if you know a little about it, it allows you to be more efficient. So don't worry about not knowing the rest, it will come one step at a time. And above all, git is all about the way you work, which means you won't completely change your working habits overnight, it will have to be gradual.

This tutorial alone should show you that it's entirely possible to keep local changes and still upgrade frequently without a lot of effort or risk. I used to dread upgrades, thinking it would be a lot of work and my code would break. I don't anymore.

the unhappy reality of upgrades

September 25th, 2007

It struck me today that as coders we do what we can to wrap our nasty, complicated code in a neat package that the user will love. They don't realize, and we don't want them to know, just how convoluted and messy the stuff is on the inside. And this holds up for long periods of time. But there comes a time when our neat little illusion cracks up and the ugliness comes into view. Bugs expose it sometimes, but upgrades do this with immaculate regularity.

Why today? Because Wordpress 2.3 was dropped today. The Wordpress people decided to toss out categories in favor of a wonderfully engineered (isn't that what we always believe?) taxonomy system. With the immediate consequence that any code that has anything to do with categories would break. That's two of my plugins. Clearly these guys are not Windows users. Microsoft's Patch and Play strategy with Windows has kept *a lot* of companies happy, as they continually strive to emulate their old bugs to accommodate programs that were written to cope with them. This has seriously handicapped Windows from making progress, because they keep pulling that huge sack of legacy code going back to probably Win3.1 (with Workgroups, yay!).

Posts used to be related to Categories with an in-between table, the classic N:M relational idiom. Now there are 4 tables, all related to each other in interesting ways. It took me quite a while to crack this code. This was introduced to add tagging support, which is quite the annoyance, because I have no interest in tagging. I find it a useless errand. And, of course, for those not tagging from the beginning you always come back to having to post-tag 600 old posts. Forget it.

Tools always help a lot, but it's very difficult to capture all the nuances, and in many cases human review is necessary anyway (particularly when themes change). And this is the sad reality of it. While minor upgrades are now handled routinely, bigger changes will always cause problems.

wordpress update script

September 22nd, 2007

Aah, the free world. It's beautiful, you have frequent releases, the code is there for you, everything's wondeful. But for web apps like Wordpress the maintenance cycle is less convenient than with desktop applications. There's no package manager to handle updates for you. Yes, that's the downside.

I've upgraded Wordpress now 3-4 times and I'm already sick of it. It's so mechanical. I've also rehearsed the cycle a bunch of times with vBulletin. Well, compared to the tidy and elegant Wordpress, vBulletin is a monster. But the upgrade issues are the same, albeit less painful now. I should have done this years ago, but now at least I have an organized way of handling these upgrades.

Here's the rationale. You download some Wordpress version from wordpress.org and install it. This we call the reference version. Then you hack on it a bit. You install plugins, maybe you hack the source a little. You change the theme a bit. And in the course of using Wordpress you also upload files with posts sometimes, for instance to include pictures with your posts.

wordpress_upgrade.png

So now the state of your Wordpress tree has changed a bit, you've added some files, maybe you've changed some files. Basically, it's different from the vanilla version. This we call mine. And now you've decided that the next Wordpress version has some nice features and bug fixes you want. This version we call latest.

You want to upgrade, but there is no upgrade path from mine to latest, because the Wordpress people can't know what you did with your local version. Upgrading from mine to latest may not be safe, it hasn't been tried.

wordpress_upgrade2.pngOf course, this sort of problem is nothing new. Coders have faced it forever. And that's why we have things like diff and patch, standard Unix tools. So here's how to upgrade safely.

  • First roll back the local changes so that we return to the reference version.
  • Save the local modifications.
  • Do a standard Wordpress upgrade going from ref to latest.
  • Re-apply, if possible, the local modifications.

And this replicates exactly what you would do manually if you wanted to be sure that the upgrade doesn't break anything. Just that it's a lot of hassle to do by hand. The upgrade is done offsite, so your blog continues to run in the meantime. And once you've upgraded, you can just move it into the right location.

In the event that merging diff and latest does not succeed, you have a list of the patches and files so that you know exactly which ones didn't succeed.

So far I've used it to do two updates, 2.2.1->2.2.2, 2.2.2->2.2.3, without any hiccups.

#!/bin/bash

# >> 0.3
# added file/dir permission tracking
# added hint for failed file merges
# added hint for failed patches

echo<<header "
################################################################################
#                                                                              #
#                      Wordpress Updater / version 0.3                         #
#                   Martin Matusiak ~ numerodix@gmail.com                      #
#                                                                              #
#  Description: A script to automate [part of] the Wordpress update cycle, by  #
#  finding my modifications to the codebase (mine), diffing them against the   #
#  official codebase (ref), and migrating files and patches to the latest      #
#  version (latest).                                                           #
#                                                                              #
#  Warning: Upgrading to a new version will probably not always work           #
#  seamlessly, depending on what changes have occurred. Do not use this as a   #
#  substitute for following the official upgrade instructions. Furthermore, if #
#  you don't understand what this script does, you probably shouldn't use it.  #
#  Also, it's always a good idea to backup your files before you begin.        #
#                                                                              #
#  Licensed under the GNU Public License, version 3.                           #
#                                                                              #
################################################################################
"
header

### <Configutation>

wpmine="/home/user/www/numerodix/blog"
version_file="${wpmine}/wp-includes/version.php"
wordpress_baseurl="http://wordpress.org"
temp_path="/home/user/t"

### </Configuration>


echo -e "Pausing 10 seconds... (Ctrl+C to abort)\007"
sleep 10


msg() {
fill=$(for i in $(seq 1 $((76 - ${#1}))); do echo -n " "; done)
echo<<msg "
++++++++++++++++++++++++++++++++++++++++++++++++++++++++++++++++++++++++++++++++
+  ${1}${fill}+
++++++++++++++++++++++++++++++++++++++++++++++++++++++++++++++++++++++++++++++++
"
msg
}


if ! mkdir -p $temp_path; then
	echo "$temp_path not created"; exit 1
fi

msg "Checking installed version... "
if [ -f $version_file ]; then 
	ref=$(cat $version_file | grep "\$wp_version" | tr -d " _$'';=[:alpha:]")
	echo $ref
else
	echo "$version_file not found"; exit 1
fi


msg "Fetching version $ref... "
[ -f $temp_path/wordpress-$ref.tar.gz ] && rm $temp_path/wordpress-$ref.tar.gz
if wget -q -P $temp_path $wordpress_baseurl/wordpress-$ref.tar.gz; then
	echo "downloaded to $temp_path"
else
	echo "could not fetch $wordpress_baseurl/wordpress-$ref.tar.gz"; exit 1
fi


msg "Unpacking reference version $ref... "
[ -d $temp_path/wordpress-$ref ] && rm -rf $temp_path/wordpress-$ref
if (cd $temp_path && tar zxf wordpress-$ref.tar.gz && mv wordpress wordpress-$ref); then
	echo "unpacked to $temp_path/wordpress-$ref"
else
	echo "failed"; exit 1
fi

wpref="$temp_path/wordpress-$ref"


msg "Diffing codebase... "
( cd $wpref && find . -type f | sed "s|\./||g" | sort > $temp_path/files-$ref-ref ) &&
( cd $wpmine && find . -type f | sed "s|\./||g" | sort > $temp_path/files-$ref-mine ) &&
diff $temp_path/files-$ref-ref $temp_path/files-$ref-mine > $temp_path/diff
if [[ $? < 2 ]]; then
	echo "diff written to $temp_path/diff"
else
	echo "failed"; exit 1
fi


msg "Recording my file/dir permissions..."
cd $wpmine && \
find . -exec ls -ld --time-style=+%s {} \; | sed "s|\./||g" | sort -k 7 \
> $temp_path/files-$ref-mine.perms
if [[ $? == 0 ]]; then
	echo "written to $temp_path/files-$ref-mine.perms"
else
	echo "failed"; exit 1
fi


msg "Listing files added/removed... "
( cat $temp_path/diff | grep "^>" | awk '{ print $2 }' > $temp_path/only_mine ) &&
( cat $temp_path/diff | grep "^<" | awk '{ print $2 }' > $temp_path/only_ref ) &&
( cat $temp_path/only_mine > $temp_path/not_common ) &&
( cat $temp_path/only_ref >> $temp_path/not_common )
if [[ $? == 0 ]]; then
	echo "mine only files written to $temp_path/only_mine"
	echo "ref only files written to $temp_path/only_ref"
else
	echo "failed"; exit 1
fi


msg "Listing files changed... "
[ -f $temp_path/changed ] && rm $temp_path/changed && touch $temp_path/changed
for i in $(cat $temp_path/files-$ref-ref); do
	if ! grep -x $i $temp_path/not_common >/dev/null; then
		if ! diff -q $temp_path/wordpress-$ref/$i $wpmine/$i >/dev/null; then
			echo $i >> $temp_path/changed
		fi
	fi
done
if [[ $(wc -l < $temp_path/changed) == "0" ]]; then
	echo "No changes detected"
else
	echo "Files changed written to $temp_path/changed"
fi


msg "Writing individual diffs... "
[ -d $temp_path/diffs ] && rm -rf $temp_path/diffs
mkdir -p $temp_path/diffs
for i in $(cat $temp_path/changed); do
	e=$( echo $i | sed "s|\./||g" | tr "/" "." )
	diff -u $temp_path/wordpress-$ref/$i $wpmine/$i > $temp_path/diffs/$e
done
ds=$(ls $temp_path/diffs | wc -l)
echo "$ds diffs in $temp_path/diffs"


msg "Fetching latest version... "
[ -f $temp_path/latest.tar.gz ] && rm $temp_path/latest.tar.gz
if wget -q -P $temp_path $wordpress_baseurl/latest.tar.gz; then
	echo "downloaded to $temp_path"
else
	echo "could not fetch $wordpress_baseurl/latest.tar.gz"; exit 1
fi


msg "Unpacking latest version... "
[ -d $temp_path/wordpress-latest ] && rm -rf $temp_path/wordpress-latest
if (cd $temp_path && tar zxf latest.tar.gz && mv wordpress wordpress-latest); then
	echo "unpacked to $temp_path/wordpress-latest"
else
	echo "failed"; exit 1
fi

wplatest="$temp_path/wordpress-latest"


msg "Trying to patch diffs... "
post=$(echo $wpmine | tr -d "/")
patch_level=$(( ${#wpmine} - ${#post} ))
[ -f $temp_path/patches.failed ] && rm $temp_path/patches.failed
for i in $(ls $temp_path/diffs); do
	cd $wplatest && patch -p$patch_level < $temp_path/diffs/$i
	if [[ $? != 0 ]]; then
		echo $temp_path/diffs/$i >> $temp_path/patches.failed
	fi
done


msg "Merging in my files... "
[ -f $temp_path/file-merge.failed ] && rm $temp_path/file-merge.failed
for i in $(cat $temp_path/only_mine); do
	d=$(dirname	$wplatest/$i)
	mkdir -p $d
	if [ -e $wplatest/$i ]; then 
		( echo "file already exists: $i"; 
		echo $i >> $temp_path/file-merge.failed )
	else
		( echo "merging: $i" && cp -a $wpmine/$i $wplatest/$i )
	fi
done


msg "Merging file/dir permissions..."
while read line; do
	f=$(echo $line | awk '{ print $7 }')
	p=$(echo $line | awk '{ print $1 }'); p=${p:1:9}
	u=$(echo ${p:0:3} | tr -d '-')
	g=$(echo ${p:3:3} | tr -d '-')
	o=$(echo ${p:6:3} | tr -d '-')
	if [ -e $wplatest/$f ]; then 
		echo "setting: $p $f"
		chmod u=$u $wplatest/$f
		chmod g=$g $wplatest/$f
		chmod o=$o $wplatest/$f
	fi
done < $temp_path/files-$ref-mine.perms


msg "Removing files I deleted... "
for i in $(cat $temp_path/only_ref); do
	[ -f $wplatest/$i ] && (echo "removing: $i" && rm $wplatest/$i)
done


msg "Complete"

[ -f $temp_path/patches.failed ] &&
echo "Some of my patches failed to apply, listed in $temp_path/patches.failed"

[ -f $temp_path/file-merge.failed ] &&
echo "Some of my files failed to merge, listed in $temp_path/file-merge.failed"

echo<<close "
The upgraded version is in $wplatest

To install the new version you'll want to do something like this:
  mv $wpmine ${wpmine}.old
  mv $wplatest $wpmine

Afterwards you can remove the temporary dir $temp_path

If the new version provides any php upgrades scripts (to upgrade the 
database), now would be a good time to run them"
close

Another option would be to use Subversion and just update between stable tags, but then again I don't have that on the server and most hosts probably don't install it. But the Subversion method and this one are functionally equivalent, with the small exception that this upgrade is done offsite while the Subversion way would typically (but not necessarily) be a live upgrade.

new posts popup

September 15th, 2007

This is a feature I've wanted to have for a long time, but until now I didn't know how to realize it. I wanted to have some kind of a notification area for new events on the blog, so that a returning visitor could immediately see what has changed since the last visit. And I definitely didn't want it on the sidebar, it had to be above the fold.

So the concept was in the back of my head for months, but I couldn't figure out how to make it look good. Then I came up with the idea of making it a popup window. Not a browser window, of course, just a layer that would show if there had been new events. Otherwise it wouldn't show up. Yes, that sounds like something. So with some digging and research, a bit of hacking and lots of debugging, here is the final result.

new_posts_overlay_ss.png

The window conveys quite a lot of information. It lists the three posts last to be published (or commented on). This way you have new posts and new comments in the same place. In the screenshot, the top entry is a post made recently. The bottom two are older posts that have received new comments.

In terms of appearance, I wanted to make the window active only if the user is using it, so on page load it is made partially transparent, onMouseOver it becomes more opaque, and onMouseOut it becomes more transparent again.

For a demo.. you have this blog. After 15 minutes of inactivity your session will expire and the window will go away. To bring it back delete your cookies from this domain (or use a different browser) and it reappears. The session is handled entirely with cookies, so for visitors who don't accept cookies, the window will always appear as if this were their first visit.

Compatibility

The opacity property is new in CSS3 and isn't uniformly supported (yet). I've tested the plugin with the following browsers.

  • Firefox 1.0.1, 2.0.0.6
  • Opera 8.0, 9.23
  • Safari 3.0.3
  • IE 5.0, 6.0, 7.0
  • Konqueror 3.5.7 (opacity support is rumored to be on the way)
  • Netscape 6.0.1, 7.0, 8.0.2, 9.0b3

In addition, there's a rather pesky layout bug in IE <7.0 that causes the height of the window (which is floating above the other content) to be added to the top of the page. If you fix it, please send a patch. :)

Also, I tried very hard to make sure it only consumes one query, which unfortunately made it very complicated. If you rewrite it in simpler terms, send a patch. :)

Required MySQL version: 4.1+
How to use

Download, unzip, install, append the css to your styles. :cap:

UPDATE: Added Netscape.

UPDATE2: MySQL compatibility.

making the spam bots feel comfortable

June 1st, 2007

A lot of famous people have said lots of interesting things about success. Little did I know the success I was about to experience when I opened this blog in 2003. It is today what it's always been, an outlet mostly for various gripes, observations, recent events etc., of no interest to anyone. Why blog? Because I feel like it (bad guys in movies always say "because I can"). And I also thought that in time I would find it amusing to read back old entries, relive the past so to speak, which I actually don't really do.

But it turns out that this blog does have a wide appeal after all. Why is anybody's guess. In the last 6 months or so interest has intensified to the point where I get 1,000 comments a week. The absolute majority of these are friendly, well meaning, helpful spam bots who want to make sure I hear about the best deals that can be made. Whoever said machines aren't friendly?

So, as more and more spam bots have found my blog and spread the word to all their friends, it's become increasingly important to make sure I'm a good host to this populous demographic. My spam bot friends have a lot to say, and they won't stop at arguing points for topics that were covered here a long time ago. The Wordpress community has helped me ensure that while I don't miss out on any spam comments, the human readers on here, who don't know my bot friends, and don't appreciate their intelligence and sense of humor, only see the human content.

Wordpress ships with Akismet, and you want to turn it on right away. But to decrease the number of spam comments, you may want to consider the Bad Behavior plugin in addition. It blocks certain types of traffic outright, not just posts but also pageviews.

The last two weeks I experimented to see whether it makes much of a difference. First I ran Bad Behaviour for a week, counted how many spam comments I got and how many were blocked. Then I ran for a week without it and counted the spam comments.

May 17-25
832 spam comments

866 spam comments blocked by Bad Behavior (out of a total 1,196 requests blocked in total)

May 25-June 1
1,320 spam comments

In both cases, all spam was caught by Akismet, so nothing actually gets published. But the difference is in how much spam is submitted and ends up in Akismet's temporary 15-day archive.

Conclusion: Bad Behavior is worthwhile. :)